

【Nuxt.js】Nuxt Contentを使って、ブログ機能を実装する – その②
目次
前回に引き続き、Nuxt Contentを使って、ブログ機能を実装する手順を紹介していきます。
前回は、Nuxt Contentの導入から、markdownファイルの用意、記事詳細ページと記事一覧ページの作成、カテゴリー一覧ページの作成までをやりました。
前回の記事をご覧になっていない方は、先にご覧ください。
【Nuxt.js】Nuxt Contentを使って、ブログ機能を実装する – その①
https://www.dailyupblog.com/web_development/1573/
Nuxt Content公式サイト
https://content.nuxtjs.org/
今回の記事で紹介する内容は、下記の通りです。
- タグ付け
- 目次自動生成
- ページャー
- 全文検索
それでは、いきましょう。
タグ付け機能の実装
まず、記事のタグ付け機能の実装です。
前回カテゴリーの実装はやったので、同じ要領で実装できます。
まず、taxonomy.jsにカテゴリーと同じようにタグを追記していきます。
今回は適当に5つほど追記します。
module.exports = {
  category: [
    { text: "カテゴリー1", slug: "category1" },
    { text: "カテゴリー2", slug: "category2" },
    { text: "カテゴリー3", slug: "category3" }
  ],
  tags: [ //追記
    { text: "タグ1", slug: "tag1" },
    { text: "タグ2", slug: "tag2" },
    { text: "タグ3", slug: "tag3" },
    { text: "タグ4", slug: "tag4" },
    { text: "タグ5", slug: "tag5" }
  ]
}
タグを設定したら、記事にタグをつけてみましょう。
以前作ったpost-1.mdファイルに追記します。
---
title: テスト投稿
description: 説明が入ります。説明が入ります。説明が入ります。説明が入ります。説明が入ります。
category: category1
tag: //追記
  - tag1
  - tag2
  - tag3
---
//・・・省略
上記のように、フロントマター部分にタグを記述します。
記事にタグの設定をしたら、続いて記事詳細ページ内に、その記事に付いているタグ一覧を出力してみます。
「post」> _slug.vueファイルに下記のように追記してください。
<template>
  <div class="container">
    <h1>{{ post.title }}</h1>
    <p>
      投稿日:{{ $dayjs(post.createdAt).format("YYYY/MM/DD") }}<br />
      更新日:{{ $dayjs(post.updatedAt).format("YYYY/MM/DD") }}
    </p>
    <p>カテゴリー:{{ getCatName(post.category) }}</p>
    <!-- 追記 -->
    <ul class="tag">
      <li v-for="(tag, i) in getTagName(post.tag)" :key="tag">
        <nuxt-link :to="'/tag/' + post.tag[i]">{{ tag }}</nuxt-link>
      </li>
    </ul>
    <!-- /追記 -->
    <nuxt-content :document="post" />
  </div>
</template>

<script>
import Vue from "vue";
import taxonomy from "@/taxonomy";
export default Vue.extend({
  async asyncData ({ $content, params }) {
    const post = await $content(`post/${params.slug}`).fetch()
    return { post }
  },
  data () {
    return {
      category: [...taxonomy.category],
      tags: [...taxonomy.tags] //追記
    }
  },
  methods: {
    getCatName (cat) {
      return this.category.find((v) => v.slug === cat).text;
    },
    /* 追記 */
    getTagName (tag) {
      const tagArray = [];
      tag.forEach((item) => {
        tagArray.push(this.tags.find((v) => v.slug === item).text);
      });
      return tagArray;
    }
    /* /追記 */
  }
})
</script>

<style scoped>
</style>
下記関数によって、記事についているタグを確認して、taxonomy.jsに記載されている対応するタグ名を配列として取得します。
    getTagName (tag) {
      const tagArray = [];
      tag.forEach((item) => {
        tagArray.push(this.tags.find((v) => v.slug === item).text);
      });
      return tagArray;
    }
取得したタグの配列は、v-forで順番に出力しています。
ここまでできたら、一度ブラウザで表示してみましょう。
ブラウザで「http://localhost:3000/post/post-1」にアクセスしてみてください。
下記のように、カテゴリーの下にタグのリストが表示されていれば、OKです。

続いて、タグ一覧ページも作成します。
カテゴリー一覧ページと同じように、対象のタグがつけられた記事の一覧が表示されるようにします。
まず、「pages」フォルダ内に「tag」>「_id」とディレクトリを作成してください。
その中にindex.vueファイルを作成して、下記のように記述してください。
<template>
  <div class="container">
    <h1>{{ getTagName($route.params.slug) }}</h1>
    <section>
      <div class="row">
        <ArticleList :posts="posts" />
      </div>
    </section>
  </div>
</template>

<script>
import Vue from "vue";
import taxonomy from "@/taxonomy";
export default Vue.extend({
  data () {
    return {
      tags: [...taxonomy.tags]
    }
  },
  async asyncData ({ store, $content, params }) {
    const posts = await $content("post")
      .sortBy('createdAt', 'desc')
      .where({ tag: { $contains: params.slug } })
      .fetch()
    return {
      posts,
    }
  },
  methods: {
    getTagName (tag) {
      return this.tags.find((v) => v.slug === tag).text;
    }
  }
})
</script>
容量は前回紹介した、カテゴリー一覧ページと全く同じです。
下記関数でパラメーターからタグのスラッグ名を取得して、taxonomy.jsから該当するタグ名を取得してきて、タイトルとして出力してます。
    getTagName (tag) {
      return this.tags.find((v) => v.slug === tag).text;
    }
あとは、asyncDataでタグがつけられた記事を全て配列で取得してきて、ArticleListコンポーネントを使って、出力しているだけです。
ブラウザで「http://localhost:3000/tag/tag1」にアクセスしてみてください。
下記のように、「タグ1」のタグがついている記事が表示されればOKです。

目次自動生成機能の実装
続いて、記事のトップに目次を自動で生成する機能を実装してみます。
ブログ記事などでは、SEO対策にも必須な目次ですが、Nuxt Contentでは、目次自動出力機能を簡単に実装することができます。
Nuxt Contentでは、取得する記事データの中に見出しデータが「toc」として入っています。
この見出しデータをv-forで順番に出力してあげるだけで、目次の自動出力機能を実装できるというわけです。
ただ、このtocに入っている見出しデータはh2タイトル、h3タイトルのみになりますので、ご注意ください。
「post」> _slug.vueファイル内に下記のように追記してください。
<template>
  <div class="container">
    <h1>{{ post.title }}</h1>
    <p>
      投稿日:{{ $dayjs(post.createdAt).format("YYYY/MM/DD") }}<br />
      更新日:{{ $dayjs(post.updatedAt).format("YYYY/MM/DD") }}
    </p>
    <p>カテゴリー:{{ getCatName(post.category) }}</p>
    <ul class="tag">
      <li v-for="(tag, i) in getTagName(post.tag)" :key="tag">
        <nuxt-link :to="'/tag/' + post.tag[i]">{{ tag }}</nuxt-link>
      </li>
    </ul>
    <!-- 追記 -->
    <h2>目次</h2>
    <div class="toc">
      <ul>
        <li v-for="toc in post.toc" :key="toc.id">
          <nuxt-link
            v-if="toc.depth == 2"
            to="#"
            v-scroll-to="{
              el: `#${toc.id}`,
            }"
            class="h2_link"
            >{{ toc.text }}</nuxt-link
          >
          <nuxt-link
            v-else-if="toc.depth == 3"
            to="#"
            v-scroll-to="{
              el: `#${toc.id}`,
            }"
            class="h3_link"
            >{{ toc.text }}</nuxt-link
          >
        </li>
      </ul>
    </div>
    <!-- /追記 -->
    <nuxt-content :document="post" />
  </div>
</template>

//・・・省略

<style scoped>
.toc li {
  list-style: none;
  line-height: 2;
}
.toc .h3_link {
  margin-left: 20px;
  font-size: 14px;
}
</style>
上記のように見出しの一覧は、「post.toc」で取得しています。
これをv-forで出力しており、h2とh3に異なったスタイルを付けるためにv-ifで異なるクラス名をつけています。
今回は簡単に違いがわかるように少しだけスタイルを追記しました。
確認のために、新しく記事を追加してみましょう。
「content」>「post」内にpost-3.mdを追加してください。
post-3.md内に下記のように記述しておきましょう。
---
title: テスト投稿 その3
description: 説明が入ります。説明が入ります。説明が入ります。説明が入ります。説明が入ります。
category: category3
tag:
  - tag2
  - tag3
  - tag4
---

## これは大タイトルですよ

文章テキスト文章テキスト文章テキスト文章テキスト文章テキスト文章テキスト文章テキスト文章テキスト文章テキスト文章テキスト文章テキスト文章テキスト文章テキスト文章テキスト文章テキスト文章テキスト文章テキスト文章テキスト文章テキスト文章テキスト文章テキスト文章テキスト文章テキスト文章テキスト文章テキスト文章テキスト文章テキスト

### これは中タイトルですよ

文章テキスト文章テキスト文章テキスト文章テキスト文章テキスト文章テキスト文章テキスト文章テキスト文章テキスト文章テキスト文章テキスト文章テキスト文章テキスト文章テキスト文章テキスト文章テキスト文章テキスト文章テキスト文章テキスト文章テキスト文章テキスト文章テキスト文章テキスト文章テキスト文章テキスト文章テキスト文章テキスト文章テキスト文章テキスト文章テキスト文章テキスト文章テキスト文章テキスト文章テキスト文章テキスト文章テキスト文章テキスト文章テキスト文章テキスト文章テキスト文章テキスト文章テキスト文章テキスト文章テキスト文章テキスト文章テキスト文章テキスト文章テキスト文章テキスト文章テキスト文章テキスト文章テキスト文章テキスト文章テキスト

## これは大タイトルその2ですよ

文章テキスト文章テキスト文章テキスト文章テキスト文章テキスト文章テキスト文章テキスト文章テキスト文章テキスト文章テキスト文章テキスト文章テキスト文章テキスト文章テキスト文章テキスト文章テキスト文章テキスト文章テキスト文章テキスト文章テキスト文章テキスト文章テキスト文章テキスト文章テキスト文章テキスト文章テキスト文章テキスト文章テキスト文章テキスト文章テキスト文章テキスト文章テキスト

### これは中タイトルその2ですよ

文章テキスト文章テキスト文章テキスト文章テキスト文章テキスト文章テキスト文章テキスト文章テキスト文章テキスト文章テキスト文章テキスト文章テキスト文章テキスト文章テキスト文章テキスト文章テキスト文章テキスト文章テキスト文章テキスト文章テキスト文章テキスト文章テキスト文章テキスト文章テキスト文章テキスト文章テキスト文章テキスト文章テキスト文章テキスト文章テキスト文章テキスト文章テキスト

### これは中タイトルその3ですよ

文章テキスト文章テキスト文章テキスト文章テキスト文章テキスト文章テキスト文章テキスト文章テキスト文章テキスト文章テキスト文章テキスト文章テキスト文章テキスト文章テキスト文章テキスト文章テキスト文章テキスト文章テキスト文章テキスト文章テキスト文章テキスト文章テキスト文章テキスト文章テキスト文章テキスト文章テキスト文章テキスト文章テキスト文章テキスト文章テキスト文章テキスト文章テキスト
h2とh3のタイトルを乱立させてみました。
これで準備は完了です。
ブラウザで「http://localhost:3000/post/post-3」にアクセスしてみてください。
下記のように、目次が出力されればOKです。
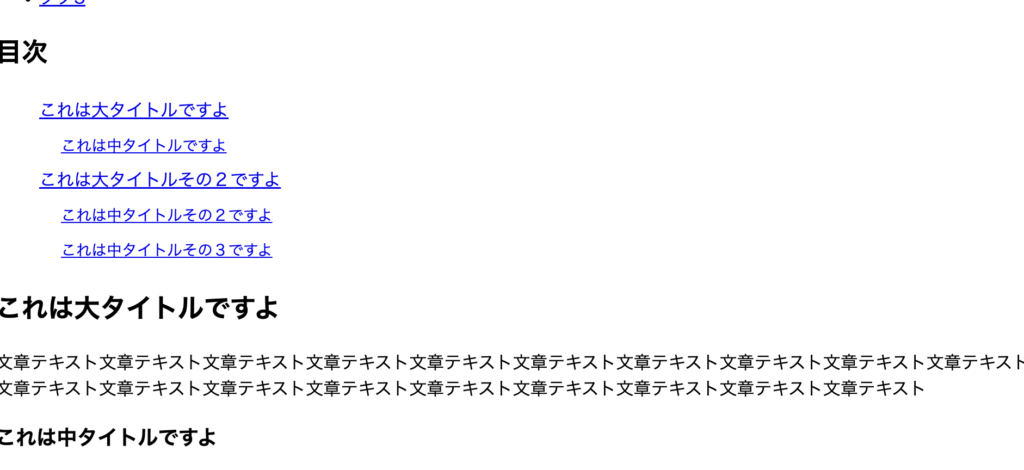
お好きなスタイルを目次に当ててください。
また、h4やh5も目次に出力したい場合は、自前で何かしら実装する必要性があります。
ページャー機能の実装
続いて、ページャー機能の実装です。
ページャーは、例えば一覧ページなどで、1ページに表示する最大の記事数を超えた場合は、2ページ目3ページ目に分ける機能です。
ページャーは使い回すので、コンポーネントで作成しましょう。
「components」フォルダ内にPagenation.vueファイルを作成してください。
<template>
  <div class="c-pagination-wrap">
    <ul class="c-pagination">
      <li v-if="current > 1" class="c-pagination-btn c-pagination-prev">
        <nuxt-link :to="getPath(current - 1)" class="c-pagination-btn__link">←</nuxt-link>
      </li>
      <li v-if="3 < current" class="c-pagination-item">
        <nuxt-link :to="getPath(1)" class="c-pagination-item__link">1</nuxt-link>
      </li>
      <li v-if="4 < current" class="c-pagination-omit">
        <span>...</span>
      </li>
      <li
        v-for="p in pages"
        :key="p"
        v-show="current - 2 <= p && p <= current + 2"
        class="c-pagination-item"
        :class="{ active: current === p }"
      >
        <nuxt-link :to="getPath(p)" class="c-pagination-item__link">{{ p }}</nuxt-link>
      </li>
      <li v-if="current + 3 < pages" class="c-pagination-omit">
        <span>...</span>
      </li>
      <li v-if="current + 2 < pages" class="c-pagination-item">
        <nuxt-link :to="getPath(pages)" class="c-pagination-item__link">{{ pages }}</nuxt-link>
      </li>
      <li v-if="current < pages" class="c-pagination-btn c-pagination-next">
        <nuxt-link :to="getPath(current + 1)" class="c-pagination-btn__link">→</nuxt-link>
      </li>
    </ul>
  </div>
</template>

<script>
export default {
  props: {
    pages: {
      type: Number,
      required: false,
    },
    current: {
      type: Number,
      required: true,
    },
    category: {
      type: String,
      required: false,
    },
    tag: {
      type: String,
      required: false,
    },
  },
  data () {
    return {
      p: "",
    }
  },
  methods: {
    getPath (p) {
      if (this.category !== undefined) {
        if (p === 1) {
          return `/category/${this.category}/`;
        } else {
          return `/category/${this.category}/page/${p}/`;
        }
      } else if (this.tag !== undefined) {
        if (p === 1) {
          return `/tag/${this.tag}/`;
        } else {
          return `/tag/${this.tag}/page/${p}/`;
        }
      } else {
        if (p === 1) {
          return `/new_post/`;
        } else {
          return `/new_post/page/${p}/`;
        }
      }
    },
  },
};
</script>

<style>
.c-pagination {
  display: flex;
  justify-content: center;
  padding: 0;
}
.c-pagination li {
  list-style: none;
}
.c-pagination li:not(:first-child) {
  margin-left: 10px;
}
</style>
上記コードが、ページャー部分の内容となります。
内容は単純で、propsで「ページ数」「現在のページ」「カテゴリースラッグ名」「タグスラッグ名」の4つのデータを取得して、ページャーを出力しているだけです。
ページャー部分は、ページ数が5ページ以上だった場合は、「…」3点リーダーで省略されるようになっています。
また、ページャーの左右には1つ前のページへ飛ぶ「←」と1つ先のページへ飛ぶ「→」が設置されるようになっています。
getPath関数では、ページャーの各番号や矢印につくリンクを生成します。
カテゴリー一覧ページの場合とタグ一覧ページの場合とその他のページで出し分けをおこなっています。
その他のページは仮で「/new_post/」という新着一覧ページを想定したスラッグ名にしていますが、ここはご自身のサイトでページャーを使用するページに合わせて適宜変えてください。
また、必要最低限のスタイルだけつけました。
お好きなスタイルをつけてみてください。
続いて、早速このコンポーネントを一覧ページに設置してみたいと思います。
今回は、カテゴリー一覧ページに設置してみます。
「category」>「_slug」> index.vueのファイルを開いて下記のように追記してください。
<template>
  <div class="container">
    <h1>{{ getCatName($route.params.slug) }}</h1>
    <section>
      <div class="row">
        <ArticleList :posts="posts" />
      </div>
      <!-- 追記 -->
      <Pagenation
        v-if="getPageCount > 1"
        :pages="getPageCount"
        :current="currentPage"
        :category="selectedCategory"
        :tag="selectedTag"
      />
      <!-- /追記 -->
    </section>
  </div>
</template>

<script>
import Vue from "vue";
import taxonomy from "@/taxonomy";
export default Vue.extend({
  data () {
    return {
      category: [...taxonomy.category]
    }
  },
  /* 追記 */
  computed: {
    posts: function () {
      const end = this.currentPage * this.parPage;
      const start = end - this.parPage;
      return this.items.slice(start, end);
    },
    getPageCount: function () {
      return Math.ceil(this.items.length / this.parPage);
    },
  },
  /* /追記 */
  async asyncData ({ store, $content, params }) {
    const items = await $content("post")
      .sortBy('createdAt', 'desc')
      .where({ category: { $contains: params.slug } })
      .skip(0).limit(store.state.indexPerPage) //追記
      .fetch()
    const parPage = 1; //追記
    const currentPage = parseInt(params.id) || 1; //追記
    const selectedCategory = params.slug; //追記
    const selectedTag = undefined; //追記
    return {
      items,
      parPage, //追記
      currentPage, //追記
      selectedCategory, //追記
      selectedTag, //追記
    }
  },
  methods: {
    getCatName (cat) {
      return this.category.find((v) => v.slug === cat).text;
    },
  }
})
</script>
上記のように記述してください。
  async asyncData ({ store, $content, params }) {
    const items = await $content("post")
      .sortBy('createdAt', 'desc')
      .where({ category: { $contains: params.slug } })
      .skip(0).limit(store.state.indexPerPage)
      .fetch()
    const parPage = 1;
    const currentPage = parseInt(params.id) || 1;
    const selectedCategory = params.slug;
    const selectedTag = undefined;
    return {
      items,
      parPage,
      currentPage,
      selectedCategory,
      selectedTag,
    }
  },
上記の箇所は、asyncDataで登録記事データを取得する際に、一緒にページャーに関する幾つかのデータを設定、取得しています。
「parPage」に入力した数値は、1ページに表示する記事の最大数になります。
今回は、3記事のみしか作ってないので、確認のために1ページに表示する最大数は1記事にしてあります。
「currentPage」は、現在のページ数、「selectedCategory」および「selectedTag」はカテゴリー一覧ページ、タグ一覧ページだった場合に、それぞれカテゴリースラッグ名とタグスラッグ名になります。
    getPageCount: function () {
      return Math.ceil(this.items.length / this.parPage);
    },
上記箇所では、全ページ数を取得しています。
ページャーは2ページ目以降になるとURLに「/page/{ページ数}/」のパラメーターが付くようにしたいです。
なので、パラメーター付きのページのファイルを「pages」フォルダ内に作る必要があります。
「pages」>「category」>「_slug」内に「page」フォルダを作成して、その中に_id.vueファイルを作成してください。
このファイルの内容は、「category」>「_slug」> index.vueと全く同じ内容を記述してください。
そこまでできたら、ページャー機能は完成です。
現状、post-1.md、post-2.md、post-3.mdの3記事があると思うので、これらの記事全て、カテゴリーを「カテゴリー1」に設定してください。
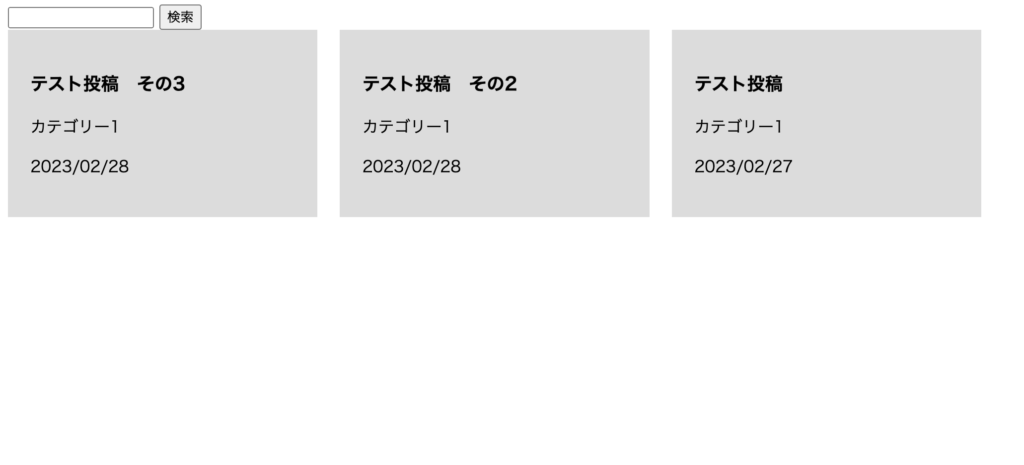
そうしたら、ブラウザで、「http://localhost:3000/category/category1/」にアクセスしてみてください。
下記のように一覧の下にページャーが表示されたらOKです。

試しに、他のページに移動して、問題なく記事が分割して表示されていれば問題ないです。
全文検索機能の実装
次は全文検索機能の実装です。
Nuxt Contentには、デフォルトで全文検索機能が備わっているので、実装はそこまで難しくないです。
下記公式サイトにも全文検索について、記載されています。
https://content.nuxtjs.org/ja/v1/getting-started/fetching/#searchfield-value
まず、検索結果ページを作成します
「pages」フォルダ内に「search」フォルダを作成し、そしてその中に_slug.vueファイルを作成します。
_slug.vueには下記のように記述してください。
<template>
  <div class="container">
    <h1>検索結果:{{ $route.params.slug }}</h1>
    <section>
      <div class="row">
        <ArticleList :posts="items" />
      </div>
    </section>
  </div>
</template>

<script>
import Vue from "vue";
import taxonomy from "@/taxonomy";
export default Vue.extend({
  data () {
    return {
      category: [...taxonomy.category]
    }
  },
  async asyncData ({ store, $content, params }) {
    const items = await $content("post")
      .sortBy('createdAt', 'desc')
      .search(params.slug)
      .fetch()
    return {
      items,
    }
  },
  methods: {
    getCatName (cat) {
      return this.category.find((v) => v.slug === cat).text;
    },
  }
})
</script>
Nuxt Contentの全文検索は、下記のように記述することで記事内に指定した文字列が含まれた記事だけを取得することが可能です。
.search(検索文字列)つまり、入力欄を設けて、inputに入力されたテキストを上記の引数に代入されればいいわけです。
今回は、「search(params.slug)」のように記述して、検索キーワードをパラメーターとして取得しています。
続いて、入力フォームの設置です。
今回は簡易的にTOPページに設置します。
「pages」直下のindex.vueを開いて下記のように追記してください。
<template>
  <div class="container">
    <!-- 追記 -->
    <form :action="`/search/${search_value}`">
      <input type="text" v-model="search_value" />
      <button>検索</button>
    </form>
    <!-- /追記 -->
    <ArticleList v-if="posts != 0" :posts="posts" />
  </div>
</template>

<script>
export default {
  name: 'IndexPage',
  /* 追記 */
  data () {
    return {
      search_value: ""
    }
  },
  /* /追記 */
  async asyncData ({ $content }) {
    const posts = await $content("post")
      .sortBy('createdAt', 'desc')
      .limit(9)
      .fetch()
    return {
      posts
    }
  },
}
</script>単純にformを設置したのですが、いくつかポイントがあって、「v-model」を利用して、入力された値が即時formタグのaction属性の値に「/search/${search_value}」の形で「search_value」に代入されるようにしてあります。
これで、検索ボタンを押せば、「/search/検索キーワード」となって、検索結果ページに遷移するというわけです。
これで準備は完了です。
試しに検索してみましょう。
ブラウザで「」にアクセスしてみましょう。
下記のように、一番上に検索フォームが設置されていればOKです。
さらに、検索フォームに「テキスト」という文言を入力して、検索ボタンを押してください。
すると検索結果ページに飛んで、下記のように3記事が表示されたと思います。
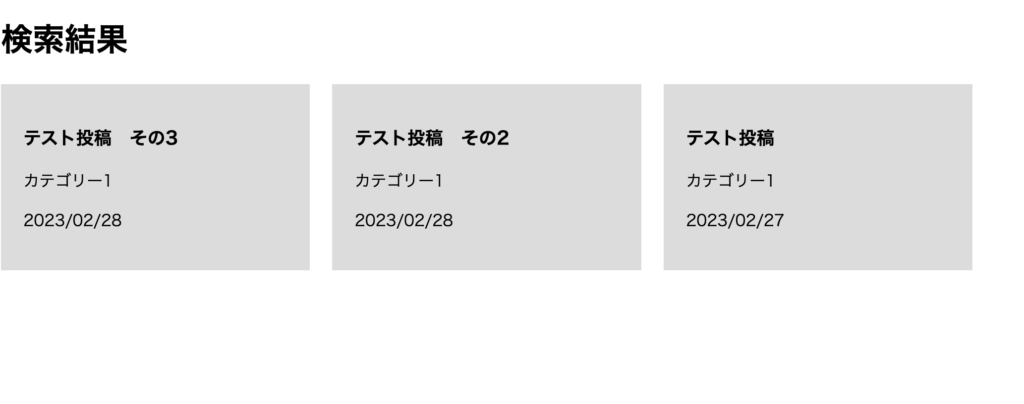
「テキスト」という文字列はこの3記事全てのページ内に含まれるものになります。
これで全文検索機能の実装ができました。
最後に
いかがだったでしょうか。
今回は、Nuxt Contentの4つの機能の実装方法を紹介しました。
どれも、実用的な機能ばかりで、これでNuxt Contentで十分ブログ機能として申し分ないことがわかりました。
もし、Nuxt Contentなどで制作したサイトにブログ機能を付けたい場合は、導入をご検討ください。
また、Nuxt Contentのカスタマイズで有用なものがありましたら、また別の記事で紹介しようと思います。
↓あわせて読みたい
【Nuxt.js】Nuxt Contentを使って、ブログ機能を実装する – その①
https://www.dailyupblog.com/web_development/1573/
関連記事
-

【Nuxt.js + Node.js】画像アップロード機能を……
-
【Vue + vue-cli】コンポーネントの基本
-
【Vue + Nuxt.js】Nuxt.jsのルーティングの……
-
【Vue + vue-cli】vue-cliの構造とHell……
-
【Vue + vue-cli】vue-routerの基本的な……
-
【Vue + vue-cli】Vue.jsとは?〜環境構築ま……
-
【Vue + vue-cli】vue-routerでパラメー……
-
【Vue + Nuxt.js】Nuxt.jsの構造とHell……
-
【Vue + Nuxt.js】Nuxt.jsでのVuexの使……
-
【Vue + vue-cli】Vuex - Vueの状態管理……
-
【Vue + vue-cli】axiosでAPI通信をしてみ……
-
【Vue + vue-cli】Vueにおけるライフサイクルに……
-
【Nuxt.js + Express】Expressで開発し……
-
【Vue + vue-cli】props、$emitについて
-
【Nuxt.js + Auth認証】Nuxt.jsでAuth……
-
【Nuxt.js + Express】Expressで開発し……
-
【Nuxt.js】Nuxt Contentを使って、ブログ機……
-

【Netlify + Nuxt.js】Netlify For……
-
【Vue + vue-cli】method、computed……
-
【Vue + vue-cli】Vueのデータバインディングま……