

【Vue + Nuxt.js】Nuxt.jsの構造とHello World表示
目次
前回の記事では、Nuxt.jsの概要と環境構築について書きました。
【Vue + Nuxt.js】Nuxt.jsとは?〜環境構築まで
https://www.dailyupblog.com/web_development/860/
今回は、Nuxt.jsのディレクトリ構造の説明と実際に触ってみて、Hello Worldを表示させるところまで、やっていきたいと思います。
それではいきましょう!
Nuxt.jsの構造
まず、Nuxt.jsのディレクトリ構造についてみていきたいと思います。
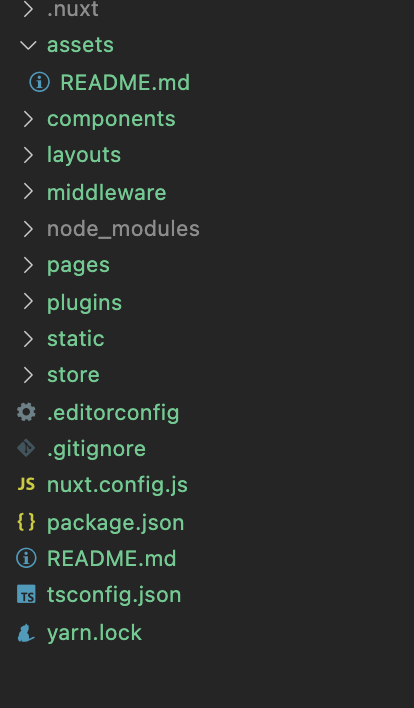
以下が、全体像です。
pages
pagesディレクトリには、アプリケーションのビューとルーティングファイルを格納します。
前回のNuxt.jsのメリットのところでも説明しましたが、Nuxt.jsは普通のVue.jsのようにルーティングの設定を行う必要がありません。
このディレクトリにファイルを追加すれば、そのままページとなります。
デフォルトでは、index.vueとREADME.mdが格納されています。
index.vueにか下記のように記述されており、ブラウザで確認した際、この内容が表示されています。
<template>
  <div class="container">
    <div>
      <Logo />
      <h1 class="title">nuxt-test</h1>
      <div class="links">
        <a
          href="https://nuxtjs.org/"
          target="_blank"
          rel="noopener noreferrer"
          class="button--green"
        >Documentation</a>
        <a
          href="https://github.com/nuxt/nuxt.js"
          target="_blank"
          rel="noopener noreferrer"
          class="button--grey"
        >GitHub</a>
      </div>
    </div>
  </div>
</template>

<script lang="ts">
import Vue from "vue";

export default Vue.extend({});
</script>

<style>
.container {
  margin: 0 auto;
  min-height: 100vh;
  display: flex;
  justify-content: center;
  align-items: center;
  text-align: center;
}

.title {
  font-family: "Quicksand", "Source Sans Pro", -apple-system, BlinkMacSystemFont,
    "Segoe UI", Roboto, "Helvetica Neue", Arial, sans-serif;
  display: block;
  font-weight: 300;
  font-size: 100px;
  color: #35495e;
  letter-spacing: 1px;
}

.subtitle {
  font-weight: 300;
  font-size: 42px;
  color: #526488;
  word-spacing: 5px;
  padding-bottom: 15px;
}

.links {
  padding-top: 15px;
}
</style>
components
componentsディレクトリは、ページにインポートする全てのコンポーネントファイルを格納します。
ヘッダーやサイドメニューなどの部品となるコンポーネントなどです。
デフォルトでは、Logo.vueファイルが格納されています。
先ほど紹介したpagesディレクトリ内のindex.vueでインポートされています。
layout
layoutディレクトリは、アプリケーションのレイアウトファイルを格納するためのディレクトリです。
このディレクトリ内に格納されているdefault.vue内にlayoutのソースを記述します。
デフォルトではdefult.vueには下記のように記述されています。
<template>
  <div>
    <Nuxt />
  </div>
</template>

<style>
html {
  font-family:
    'Source Sans Pro',
    -apple-system,
    BlinkMacSystemFont,
    'Segoe UI',
    Roboto,
    'Helvetica Neue',
    Arial,
    sans-serif;
  font-size: 16px;
  word-spacing: 1px;
  -ms-text-size-adjust: 100%;
  -webkit-text-size-adjust: 100%;
  -moz-osx-font-smoothing: grayscale;
  -webkit-font-smoothing: antialiased;
  box-sizing: border-box;
}

*,
*::before,
*::after {
  box-sizing: border-box;
  margin: 0;
}

.button--green {
  display: inline-block;
  border-radius: 4px;
  border: 1px solid #3b8070;
  color: #3b8070;
  text-decoration: none;
  padding: 10px 30px;
}

.button--green:hover {
  color: #fff;
  background-color: #3b8070;
}

.button--grey {
  display: inline-block;
  border-radius: 4px;
  border: 1px solid #35495e;
  color: #35495e;
  text-decoration: none;
  padding: 10px 30px;
  margin-left: 15px;
}

.button--grey:hover {
  color: #fff;
  background-color: #35495e;
}
</style>
<Nuxt />の部分にpages内のコンポーネントファイルが読み込まれます。
middleware
middlewareディレクトリは、アプリケーションのミドルウェアを格納するディレクトリです。
ミドルウェアとはページレイアウトグループをレンダリングする前などにカスタム関数を実行することを可能にしてくれます。
store
storeディレクトリは、以前紹介しましたvuexのstoreファイルを格納します。
下記記事で、vuexについて解説しているので、ご参照ください。
【Vue + vue-cli】Vuex – Vueの状態管理ライブラリ
https://www.dailyupblog.com/web_development/802/
普通のvue.jsのように他の設定は不要で、この中にindex.jsファイルを追加すると、自動でvuexのstoreのオプションが自動的に有効になります。
assets
assetsディレクトリは、スタイル(cssファイル)や画像ファイルなどを格納します。
とりあえず画像類は全てここに格納します。
グローバルCSSファイル(全体共通のスタイル)などもここに格納してください。
static
staticディレクトリは例えば、favicon(Webサイトのアイコン)ファイルのような、ルートディレクトリに格納しなければならないファイルを格納するためのディレクトリです。
staticディレクトリは直接サーバーのルートディレクトリに配置されます。
nuxt.config.js
nuxt.config.jsファイルはNuxt.jsにおいて設定を行える唯一のファイルです。
追加したモジュールなどで設定を追加した場合などがあった場合はここに記述します。
デフォルトでは下記のように記述されています。
export default {
  // Global page headers: https://go.nuxtjs.dev/config-head
  head: {
    title: 'nuxt-test',
    htmlAttrs: {
      lang: 'en'
    },
    meta: [
      { charset: 'utf-8' },
      { name: 'viewport', content: 'width=device-width, initial-scale=1' },
      { hid: 'description', name: 'description', content: '' }
    ],
    link: [
      { rel: 'icon', type: 'image/x-icon', href: '/favicon.ico' }
    ]
  },

  // Global CSS: https://go.nuxtjs.dev/config-css
  css: [
    'element-ui/lib/theme-chalk/index.css'
  ],

  // Plugins to run before rendering page: https://go.nuxtjs.dev/config-plugins
  plugins: [
    '@/plugins/element-ui'
  ],

  // Auto import components: https://go.nuxtjs.dev/config-components
  components: true,

  // Modules for dev and build (recommended): https://go.nuxtjs.dev/config-modules
  buildModules: [
    // https://go.nuxtjs.dev/typescript
    '@nuxt/typescript-build',
  ],

  // Modules: https://go.nuxtjs.dev/config-modules
  modules: [
  ],

  // Build Configuration: https://go.nuxtjs.dev/config-build
  build: {
    transpile: [/^element-ui/],
  }
}
package.json
普通のVue.jsと同様に、インストールしたモジュールの情報が全てここに記述されています。
yarn installコマンドを実行した際に、このファイルに記述してあるモジュールが全て、「node_modules」フォルダにインストールされます。
Hello Worldを表示してみる
ここまで、ざっくりとディレクトリ構造をみてきたので、実際に触ってみましょう。
とりあえず、Hello Worldを画面上に表示させてみましょう。
「pages」フォルダ内のindex.vueを開いて、不要箇所を削除し、h2でHello Worldを記述してください。
ソースは以下になります。
<template>
  <div class="container">
    <div>
      <h2>Hello World!!</h2>
    </div>
  </div>
</template>

<script lang="ts">
import Vue from "vue";

export default Vue.extend({});
</script>

<style>
.container {
  margin: 0 auto;
  min-height: 100vh;
  display: flex;
  justify-content: center;
  align-items: center;
  text-align: center;
}

.title {
  font-family: "Quicksand", "Source Sans Pro", -apple-system, BlinkMacSystemFont,
    "Segoe UI", Roboto, "Helvetica Neue", Arial, sans-serif;
  display: block;
  font-weight: 300;
  font-size: 100px;
  color: #35495e;
  letter-spacing: 1px;
}

.subtitle {
  font-weight: 300;
  font-size: 42px;
  color: #526488;
  word-spacing: 5px;
  padding-bottom: 15px;
}

.links {
  padding-top: 15px;
}
</style>
この状態で、ブラウザでページを確認してみましょう。
すると下記のように表示されるはずです。
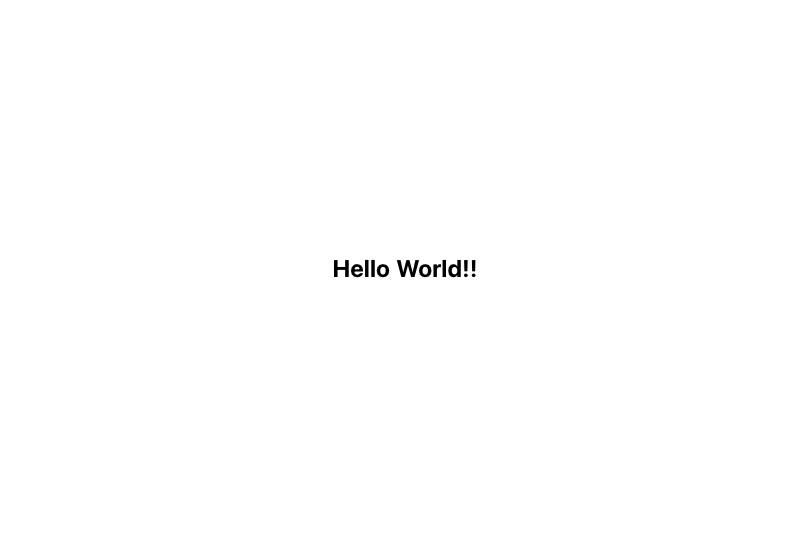
このように表示されたら成功です。
Nuxt.jsももちろんホットリロードなので、変更を保存したら、即座に画面に反映されます。
まとめ
いかがでしたでしょうか。
基本のディレクトリ構成を理解して、Nuxt.jsについて理解を深めていきましょう。
それでは今回はここまで!
お疲れ様でした!
下記Nuxt.js公式のディレクトリ構造についてです。
https://ja.nuxtjs.org/docs/2.x/get-started/directory-structure
関連記事
-
【Vue + vue-cli】axiosでAPI通信をしてみ……
-
【Node.js + Express】ExpressでRES……
-
【Node.js + Express】Postされたデータを……
-
【Express + JWT】ExpressでJWTを使った……
-

【Nuxt.js】Nuxt Contentを使って、ブログ機……
-
【Vue + vue-cli】コンポーネントの基本
-
【Vue + Nuxt.js】Nuxt.jsのルーティングの……
-

【Node.js + PostgreSQL】取得したデータを……
-
【Vue + vue-cli】vue-routerの基本的な……
-
【Vue + Nuxt.js】Nuxt.jsでのVuexの使……
-
【Vue + vue-cli】Vue.jsとは?〜環境構築ま……
-
【Vue + vue-cli】vue-routerでパラメー……
-
【Vue + vue-cli】props、$emitについて
-
【Node.js + Express】ミドルウェアを使ってみ……
-
【Node.js】アクセスされたURLの取得と処理の振り分け
-
【Nuxt.js + Express】Expressで開発し……
-
【Vue + vue-cli】Vueにおけるライフサイクルに……
-

【Netlify + Nuxt.js】Netlify For……
-
【Vue + Nuxt.js】Nuxt.jsとは?〜環境構築……
-

【React.js】React.jsとは?環境構築やHell……