

【Vue + vue-cli】vue-routerの基本的な使い方

目次
今回は今までも少し触れてきたvur-routerについて使い方をご紹介しようと思います。
Vue.jsの環境構築などについては過去の記事で紹介しているので、そちらを先に読むことをお勧めします。
○Vue.jsとは?〜環境構築まで
https://www.dailyupblog.com/web_development/716/
○vue-cliの構造とHello World表示
https://www.dailyupblog.com/web_development/726/
○コンポーネントの基本
https://www.dailyupblog.com/web_development/742/
今回もvue-cliを使用します。
それではいきましょう。
vue-routerとは?
vue-routerとはVue.jsの公式のルータです。
SPA開発などにおいて、ページのルーティング(ページ遷移)を実装してくれるプラグインになります。
公式サイト
https://router.vuejs.org/ja/
vue-routerには優れた点がいくつかあります。
- SPAでもURL履歴イベントをブラウザ内に構築可能
- 一般的なページ遷移のような挙動になるため、ユーザビリティが向上
- 各画面を単一のページとして認識させることができるため、SEO的にも有効
- 細かいナビゲーションコントロールや自動付与のCSS class、カスタム可能なスクロール機能など、優れた機能がある
などがあります。
とにかく、SPAを開発するにおいては欠かせないプラグインだということです。
vue-routerを用いた画面遷移実装
それでは早速、vue-routerを用いて、画面遷移を実装してみようと思います。
データは以前のVue.js環境構築の記事でセットアップしたものを流用しようと思います。
こちらを参照してください。
https://www.dailyupblog.com/web_development/716/
vue-routerインストール
まず、vue-routerをインストールします。
(vueプロジェクト制作時にコマンド上でvue-routerインストールを許可した場合は不要です)
//npmの場合
npm install vue-router

//yarnの場合
yarn add vue-router
main.jsにvue-routerを設定
vue-routerを利用できるようにするためにmain.jsに下記を記述
(vueプロジェクト制作時にコマンド上でvue-routerインストールを許可した場合は設定済みですので不要です)
// The Vue build version to load with the `import` command
// (runtime-only or standalone) has been set in webpack.base.conf with an alias.
import Vue from 'vue'
import App from './App'
import router from './router'

Vue.config.productionTip = false

/* eslint-disable no-new */
new Vue({
  el: '#app',
  router,
  components: { App },
  template: '<App/>'
})
上記のように「import router from ‘./router’」「router,」を追記。
routerフォルダ追加
vue-routerのインストールが完了いたしましたら、次はApp.vueファイルと同階層に「vue-router」フォルダを作成してください。
(vueプロジェクト制作時にコマンド上でvue-routerインストールを許可した場合はすでに作成済みですので、不要です)
その中にindex.jsファイルを作成してください。
index.jsファイル内には以下を記述します。
import Contact from "@/pages/Contact";
import Profile from "@/pages/Profile";
import Top from "@/pages/Top";
import Vue from "vue";
import Router from "vue-router";

Vue.use(Router);

export default new Router({
  routes: [
    {
      path: "/",
      name: "Top",
      component: Top
    },
    {
      path: "/profile",
      name: "Profile",
      component: Profile
    },
    {
      path: "/contact",
      name: "Contact",
      component: Contact
    }
  ]
});
上記のように記述することで、設定したURLになった時に、ページコンポーネントとして設定したページに切り替わります。
ページが増えるごとにrouter:の中に追記していきます。
今回はトップページ含め、3ページ作る予定ですので、上記のように3ページ分設定します。
ポートフォリオサイトと仮定して、Topページ、Profileページ、Contactページの3ページにします。
ページコンポーネント作成
「components」フォルダと同階層に「pages」フォルダを作り、その中にTop.vue、Profile.vue、Contact.vueを作成します。
各ファイルの内容は以下の通りです。
<template>
  <main>
    <h2>{{title}}</h2>
  </main>
</template>

<script>
export default {
  data () {
    return {
      title: "TOPページです。"
    }
  }
}
</script>

<style scoped>
main {
  height: calc(100vh - 152px);
  padding: 3% 0;
  box-sizing: border-box;
  display: flex;
  justify-content: center;
  align-items: center;
}
h2 {
  margin: 0;
}
</style>
<template>
<main>
<h2>{{title}}</h2>
</main>
</template>
<script>
export default {
data () {
return {
title: "プロフィールページです。"
}
}
}
</script>
<style scoped>
main {
height: calc(100vh - 152px);
padding: 3% 0;
box-sizing: border-box;
display: flex;
justify-content: center;
align-items: center;
}
h2 {
margin: 0;
}
</style><template>
<main>
<h2>{{title}}</h2>
</main>
</template>
<script>
export default {
data () {
return {
title: "お問い合わせページです。"
}
}
}
</script>
<style scoped>
main {
height: calc(100vh - 152px);
padding: 3% 0;
box-sizing: border-box;
display: flex;
justify-content: center;
align-items: center;
}
h2 {
margin: 0;
}
</style>ページ表示領域にrouterタグを挿入
ページ内のページコンポーネントが表示される領域部分にvue-routerのタグを設置します。
App.vueを開いて下記のように<router-view />を挿入してださい。
<template>
  <div id="app">
    <Header />
    <router-view />
    <Footer />
  </div>
</template>

<script>
import Header from './components/Header.vue'
import Footer from './components/Footer.vue'
export default {
  components: {
    Header,
    Footer
  }
}
</script>

<style>
body {
  margin: 0;
}
#app {
  font-family: "Avenir", Helvetica, Arial, sans-serif;
  -webkit-font-smoothing: antialiased;
  -moz-osx-font-smoothing: grayscale;
  text-align: center;
  color: #2c3e50;
}
</style>
ヘッダーにリンクを表示
最後にヘッダーに各ページへ遷移するリンクを設置します。
「components」フォルダ内にHeader.vueを作成します。
Header.vueには下記のように記述してください。
<template>
  <header>
    <div class="row">
      <router-link to="/">Top</router-link>
      <router-link to="/profile">Profile</router-link>
      <router-link to="/contact">Contact</router-link>
    </div>
  </header>
</template>

<script>
export default {
  data () {
    return {
      title: "ヘッダー"
    }
  }
}
</script>

<style scoped>
header {
  padding: 1.8em 5%;
  background: #778899;
}
header .row {
  text-align: right;
}
header a {
  color: #fff;
  text-decoration: none;
  margin-left: 2em;
}
header a:hover {
  text-decoration: underline;
}
h1 {
  margin: 0;
  color: #fff;
}
</style>
vue-routerにおけるリンクは「<router-link to=”リンク先のルートパス”>テキスト</router-link>」で記述します。
Topページの場合は上記のように「<router-link to=”/”>Top</router-link>」になります。
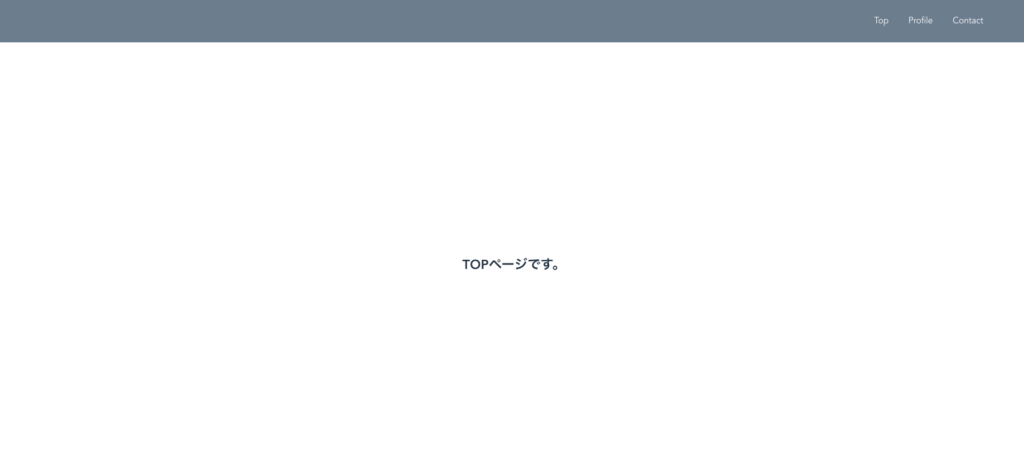
ここまでできたらサーバーを起動し、ブラウザでページにアクセスしてみましょう。
以下のように表示されるはずです。
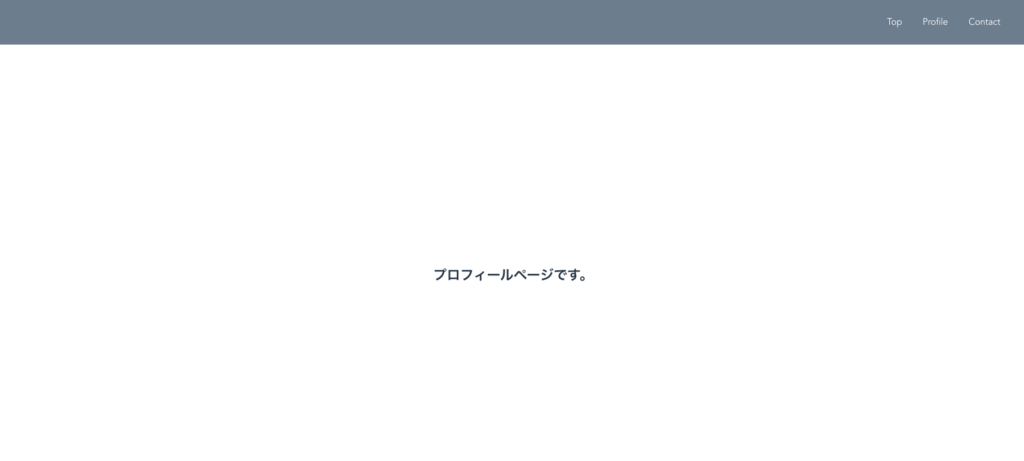
右上のナビゲーションで「Profile」をクリックすると、以下のようにProfleページが表示されるはずです。
まとめ
vue-routerの基本的な使い方は以上です。
あくまでこれは一番簡単で基本的な使い方なので、より応用的な使い方はあります。
今回はこのように基本を解説したので、今後より応用的な例も記事にしていければと思います。
本日はここまで!
お疲れ様でした!
関連記事
-
【Node.js + Express】ExpressでRES……
-

【Ajax】Ajax通信とは?概要と使い方
-

【Node.js】Node.jsとは?概要と特徴、環境構築、……
-

【Vue + Nuxt.js】Nuxt.jsの構造とHell……
-
【Node.js】ejsを使ってページを表示する
-
【Express + JWT】ExpressでJWTを使った……
-

【Nuxt.js + Element】Nuxt.jsでEle……
-
【Node.js + Express】Nodeのフレームワー……
-
【Node.js + PostgreSQL】Node.jsを……
-
【Vue + vue-cli】vue-routerでパラメー……
-
【Vue + vue-cli】axiosでAPI通信をしてみ……
-
【Vue + vue-cli】props、$emitについて
-
【Nuxt.js + Auth認証】Nuxt.jsでAuth……
-

【Vue + Netlify】NetlifyでVueサイトを……
-
【Vue + vue-cli】Vueのデータバインディングま……
-
【Nuxt.js】Nuxt Contentを使って、ブログ機……
-
【Vue + vue-cli】vue-cliの構造とHell……
-
【Node.js + Express】ExpressでRES……
-
【Vue + vue-cli】Vueにおけるライフサイクルに……
-
【Vue + Nuxt.js】Nuxt.jsでのVuexの使……