
【Nuxt.js + Node.js】画像アップロード機能を実装する
目次
今回はNuxt.jsとNode.jsを使って画像データをアップロードする方法をまとめます。
画像のアップロード機能はアプリケーションの様々な場面で使われている機能です。
Nuxt.jsでフロントエンド、Node.jsでAPIを作ります。
データベースはPostgreSQLを使います。
それではいきましょう。
データベースを用意する。
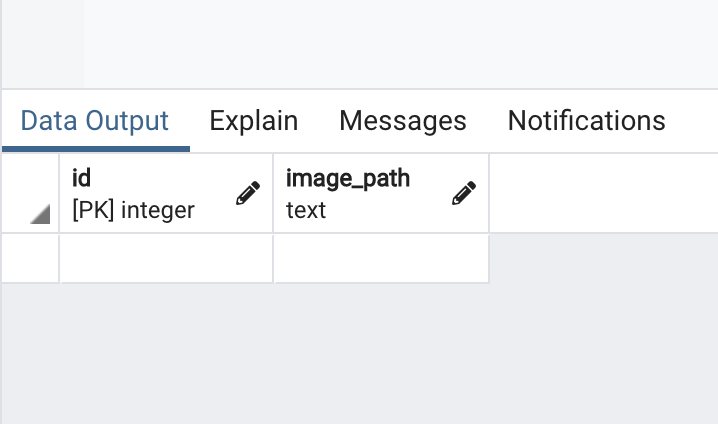
まず、画像データ情報を保存するためのデータベースを用意します。
テーブル名は「images_data」にします。
今回は簡単にしたいので、「id」と「画像を保存したディレクトリのパス」の2つの情報のみにします。
idをプライマリーキーにして、「1」から連番にするために、PostgreSQLの「generated always as identity」を設定しておきましょう。
※PostgreSQLの「generated always as identity」については下記をご参照ください。
GENERATED ALWAYS/BY DEFAULT を設定する(連続した数値を自動でカラムに格納する) – DBOnline
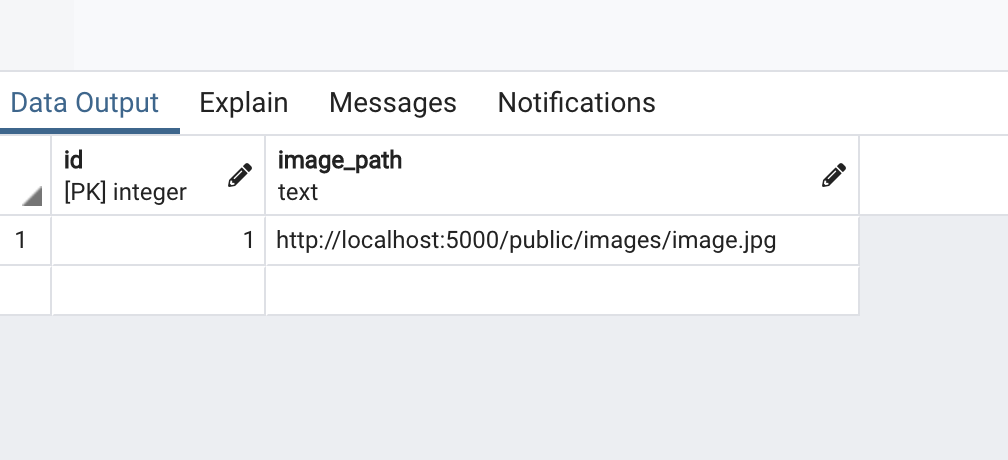
最終的に下記のようになればOKです。
データベースの用意はこれで完了です。
ExpressでAPIを作る
続いて、API部分を作ります。
expressにて、プロジェクトを用意しましょう。
「img_upload_api」という名のディレクトリを用意して、その中でexpress-generatorを利用して、プロジェクトを作りましょう。
expressの導入については下記を参照ください。
https://www.dailyupblog.com/backend_development/1037/#chapter-4
ポート番号は5000にしたいので、下記記事を参照にポート番号を変更してください。
https://www.dailyupblog.com/web_development/1078/#chapter-4
続いて、必要なモジュールのインストールをします。
今回使うモジュールは下記の二つです。
- axios(REST-APIを実行するために必要)
- multer(ファイルアップロードでよく使われるミドルウェア)
//npmの場合
npm install axios multer

//yarnの場合
yarn add axios multer
さて、プロジェクトを用意したら、「routes」ディレクトリのindex.jsを開きましょう。
今回はここにAPIのプログラムを記述していきます。
const express = require("express");
const router = express.Router();
const multer = require("multer");

const pool = require("../db/pool");

//画像データ情報登録API
router.post("/", function (req, res, next) {
  const { img_path } = req.body;
  pool.query("INSERT INTO images (img_path) VALUES ($1)", [img_path], function (
    error,
    results
  ) {
    if (error) {
      res.status(500).json({
        status: "500 Internal Server Error",
        error: error,
      });
    }
    res.status(201).json({
      status: "success",
    });
  });
});

const storage = multer.diskStorage({
  // ファイルの保存先を指定(今回はsrc/public/image以下に画像を保存)
  destination: function (req, file, cb) {
    cb(null, "public/images");
  },
  // ファイル名を指定(オリジナルのファイル名を指定)
  filename: function (req, file, cb) {
    cb(null, file.originalname);
  },
});

//画像データアップロードAPI
const upload = multer({
  storage: storage,
}).single("file");

router.post("/image", function (req, res, next) {
  upload(req, res, function (error) {
    if (error) {
      res.json({
        status: "error",
        error: "fail to upload image",
      });
    } else {
      res.json({
        status: "success",
        path: res.req.file.filename,
      });
    }
  });
});

module.exports = router;
上から見ていきましょう。
まず下記が「画像データ情報登録API」です。
画像IDと画像の保存先パスの二つの情報をデータベースに保存します。
画像IDはデータベース側で「generated always as identity」を設定したので、連番で自動で入ります。
画像の保存先パスはリクエストボディから受け取ったものを入れるようにします。
続いて、multerを使って、画像の保存先パスと保存する画像のフォルダ名を設定しましょう。
const storage = multer.diskStorage({
  // ファイルの保存先を指定(今回はsrc/public/image以下に画像を保存)
  destination: function (req, file, cb) {
    cb(null, "public/images");
  },
  // ファイル名を指定(オリジナルのファイル名を指定)
  filename: function (req, file, cb) {
    cb(null, file.originalname);
  },
});
続いて、「画像アップロードAPI」では、先ほど設定したファイル保存先とファイル名で実際に画像のアップロードを行います。
このAPIを実行すると、アップロードした画像が指定した保存先に保存されます。
//画像データアップロードAPI
const upload = multer({
  storage: storage,
}).single("file");

router.post("/image", function (req, res, next) {
  upload(req, res, function (error) {
    if (error) {
      res.json({
        status: "error",
        error: "fail to upload image",
      });
    } else {
      res.json({
        status: "success",
        path: res.req.file.filename,
      });
    }
  });
});
これでAPIは完成です。
Nuxt.jsでUI部分を作る
続いて、Nuxt.jsで画像アップロードアプリケーションのUI部分を作ります。
今回は画像アップロードの部分でUIコンポーネントライブラリのElementを使います。
ですので、Nuxt.jsプロジェクト作成の際には、Elementを使えるようにインストールしておいてください。
「img_uploader」というプロジェクト名でNuxt.jsプロジェクトを作成してください。
Nuxt.jsプロジェクトの作成については下記をご参照ください。
https://www.dailyupblog.com/web_development/860/#chapter-4
さて、早速作っていきましょう。
まず、必要なモジュールをインストールしていきましょう。
必要なモジュールはaxiosだけですので、axiosをインストールしましょう。
//npmの場合
npm install axios

//yarnの場合
yarn add axios
続いて、画像アップロードページを作っていきます。
まず、APIを実行するファイルを作成していきます。
プロジェクトフォルダ直下に「api」フォルダを作成し、この中にindex.tsファイルを作成します。
index.jsの中身は以下の通りです。
import axios from "axios";

const myApi = axios.create({
  baseURL: `http://localhost:5000/`,
  responseType: "json",
});

export default {
  async postImgData(data: any) {
    try {
      console.log(data.image_path);
      await myApi.post("", data);
    } catch (error) {
      console.log(error);
    }
  },
  async uploadImgData(imageFile: any) {
    try {
      const formData = new FormData();
      formData.append("file", imageFile);
      const config = {
        headers: {
          "content-type": "multipart/form-data",
        },
      };
      let res = await myApi.post("/image", formData, config);
      if (res.data.status === "error") {
        alert(res.data.error);
      } else {
        alert("登録完了");
      }
      console.log(res);
    } catch (error) {
      console.error(error);
    }
  },
};
「postImgData」関数は受け取った画像パスデータを先ほど作った画像データ情報登録APIを実行して、データベースに保存します。
idに関しては、「generated always as identity」をデータベース側で指定しているため、image_pathのみを渡します。
「uploadImgData」関数は受け取った引数を先ほど作った画像アップロードAPIを実行して、対象のディレクトリに画像を保存します。
続いて、「pages」フォルダ内のindex.vueを開いて、下記のように記述してください。
<template>
  <div class="container">
    <el-form ref="form" :model="form">
      <el-form-item>
        <el-upload
          class="upload-demo"
          drag
          action="#"
          :on-success="onSuccess"
          :before-upload="handleBefore"
          multiple
          :limit="1"
        >
          <i class="el-icon-upload"></i>
          <div class="el-upload__text">
            Drop file here or
            <em>click to upload</em>
          </div>
          <div class="el-upload__tip" slot="tip">jpg/png files with a size less than 500kb</div>
        </el-upload>
      </el-form-item>
      <el-form-item>
        <el-button type="primary" @click="submitForm('form')">投稿</el-button>
      </el-form-item>
    </el-form>
  </div>
</template>

<script>
import Vue from "vue";
import api from "~/api/index";
import axios from "axios";
export default Vue.extend({
  data () {
    return {
      form: {
        image_path: "",
      },
      fileList: null
    };
  },
  methods: {
    async uploadImgData () {
      await api.uploadImgData(
        this.fileList
      );
    },
    async postImgData () {
      await api.postImgData(
        this.form
      );
    },
    submitForm (data) {
      this.$refs[data].validate((valid) => {
        if (valid) {
          this.uploadImgData();
          this.postImgData();
          alert('submit!');
        } else {
          console.log('error submit!!');
          return false;
        }
      });
    },
    onSuccess (res, file) {
      this.fileList = file.raw;
      this.form.image_path = `http://localhost:5000/public/images/${file.raw.name}`;
    },
    handleBefore (file) {
      const fileType =
        file.type === "image/jpeg" ||
        file.type === "image/jpg" ||
        file.type === "image/png";
      const isLt100KB = file.size / 1024 < 500;

      if (!fileType) {
        this.$message.error(
          "アイコンは拡張子が jpeg/jpg/png でないと登録できません。"
        );
      }
      if (!isLt100KB) {
        this.$message.error(
          "アイコンはサイズが 500KB 以内でないと登録できません。"
        );
      }
      return fileType && isLt100KB;
    }
  }
});
</script>

<style scoped>
.container {
  display: flex;
  justify-content: center;
  align-items: center;
  height: 100vh;
}
</style>
Elementの「el-form」と「el-upload」を使います。
「el-form」には、data()にあるformオブジェクトを設定しておきます。
formオブジェクトの中身は画像のファイルパスが入る「imgFile」が入っています。
最終的にこのformオブジェクトがリクエストボディとして、APIに渡されます。
methodには、「uploadImgData」関数と「postImgData」関数を設定しておきます。
この二つは先ほど作った「api」内のindex.jsに記載されている二つの関数をそれぞれ呼び出す関数です。
    async uploadImgData () {
      await api.uploadImgData(
        this.fileList
      );
    },
    async postImgData () {
      await api.postImgData(
        this.form
      );
    },
「submitForm」関数は上記二つの関数を実行します。
その際、フォームのバリデートの判定も行います。
    submitForm (data) {
      this.$refs[data].validate((valid) => {
        if (valid) {
          this.uploadImgData();
          this.postImgData();
          alert('submit!');
        } else {
          console.log('error submit!!');
          return false;
        }
      });
    },
「onSuccess」関数は正常に画像がアップロードされた際のフック関数になります。
data()内にあるfileListに画像のフルパスを代入します。
「handleBefore」関数は画像のアップロード前に実行される関数です。
画像の拡張子や画像の最大サイズを指定し、それに適さないものはエラーで省かれるような設定がされています。
    onSuccess (res, file) {
      this.fileList = file.raw;
      this.form.image_path = `http://localhost:5000/public/images/${file.raw.name}`;
    },
    handleBefore (file) {
      const fileType =
        file.type === "image/jpeg" ||
        file.type === "image/jpg" ||
        file.type === "image/png";
      const isLt100KB = file.size / 1024 < 500;

      if (!fileType) {
        this.$message.error(
          "アイコンは拡張子が jpeg/jpg/png でないと登録できません。"
        );
      }
      if (!isLt100KB) {
        this.$message.error(
          "アイコンはサイズが 500KB 以内でないと登録できません。"
        );
      }
      return fileType && isLt100KB;
    }
これで完成です。
実際に「http:localhost:3000」をブラウザで開いてください。
そうすると下記のように表示されると思います。
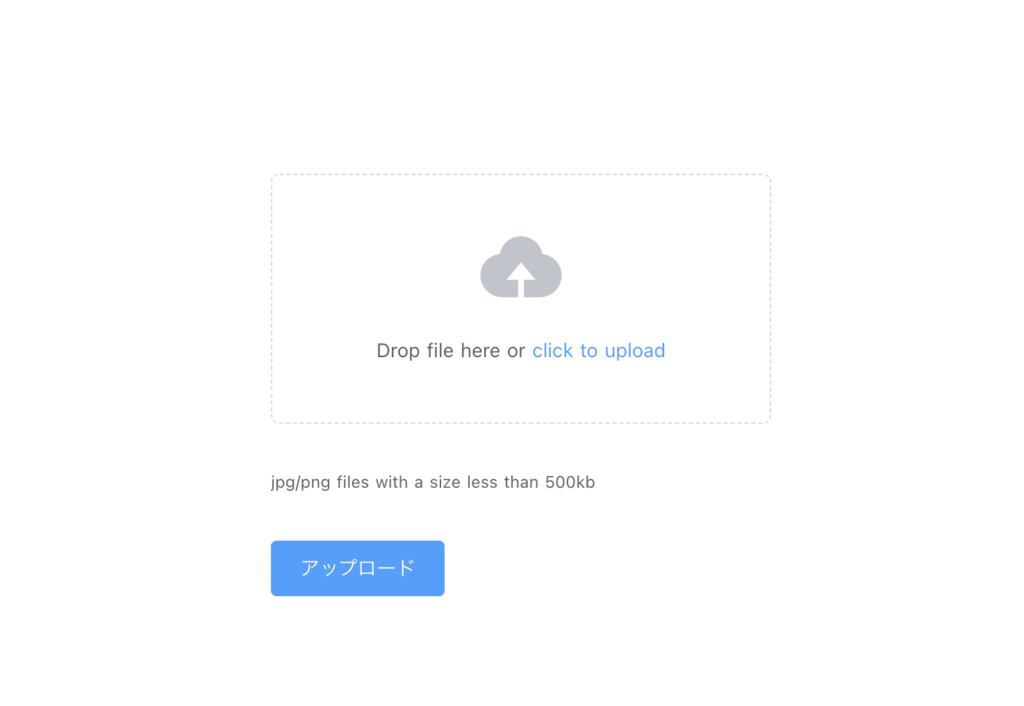
ここに画像をドラッグ&ドロップして「アップロード」をクリックしてください。
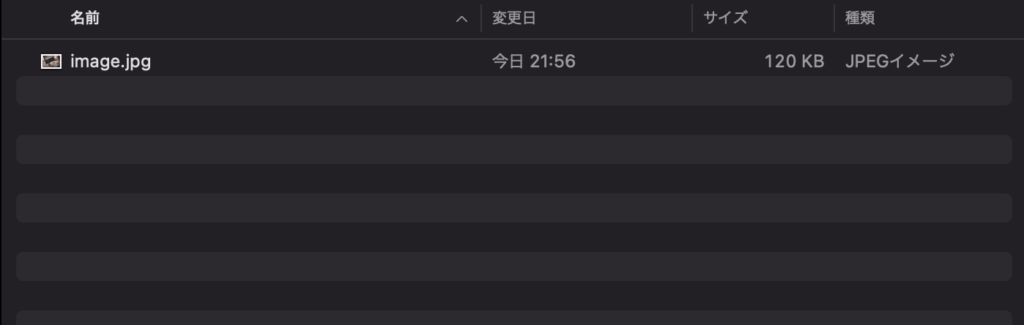
無事成功したら、まず「img_upload_api」フォルダ内の「public」>「images」内を確認してみましょう。
アップロードした画像が保存されていたらOKです。
続いて、pgadminを開いてみましょう。
データベースに先ほどアップロードした画像のidとパスが保存されていたら、成功です。
まとめ
今回は、画像アップロード機能を作ってみました。
画像アップロードは画像の投稿や、プロフィール画像の登録など、さまざまな場面でアプリケーションにおいて使われているので、是非押さえておきたいところです。
今回は以上です。
お疲れ様でした。
関連記事
-

【Vue + vue-cli】コンポーネントの基本
-
【Vue + vue-cli】vue-cliの構造とHell……
-
【Vue + vue-cli】Vueにおけるライフサイクルに……
-

【Nuxt.js + Express】Expressで開発し……
-
【Nuxt.js】Nuxt Contentを使って、ブログ機……
-

【Vue + Netlify】NetlifyでVueサイトを……
-
【Node.js + Express】リクエストからパラメー……
-

【Node.js】アクセスされたURLの取得と処理の振り分け
-
【Node.js】ejsを使ってページを表示する
-
【Node.js】Node.jsで簡易的なサーバーを起動して……
-
【Node.js + Express】Nodeのフレームワー……
-
【Vue + vue-cli】method、computed……
-
【Vue + Nuxt.js】Nuxt.jsのルーティングの……
-

【Ajax】Ajax通信とは?概要と使い方
-
【Nuxt.js + Express】Expressで開発し……
-
【Vue + vue-cli】axiosでAPI通信をしてみ……
-
【Vue + Nuxt.js】Nuxt.jsとは?〜環境構築……
-
【Node.js + Express】ExpressでRES……
-

【React.js】React.jsとは?環境構築やHell……
-

【Nuxt.js + Element】Nuxt.jsでEle……